
The journals that follow come from my experiences of six decades of bushwalking with friends, family and that next generation of mini-bushwalkers…the grandkids.
They are accounts of bushwalks and kayak trips that range from long distance treks… occasionally arduous, through to easy day walks or maybe even just an hour or two poking around in my sea kayak.
For those of you addicted to those interminable blow by blow navigational track notes, altitude gain/loss, track logs and lists of waypoints, look elsewhere. But if you share an ancient track dog’s enthusiasm for maps and journeys across landscapes, read on. I hope you find them informative. And as that great 16th century Dutch maritime explorer, Abel Tasman noted: “He who might wish to know his country must first walk over it.”
Bushwalking is an Australian word. You may know it as hiking, tramping, fell walking, hill walking, rambling or trekking.
Apparently, the term bushwalking is increasingly seen as being old fashioned and unappealing to younger hikers in Australia.
But whether you call yourself an adventurer, expeditioner, seeker, wayfinder, explorer, trail runner, hiker or bushwalker, we all share a love of roaming the great Australian bush.
Want to read more about the history of bushwalking in Australia ? Check out Melissa Harper’s The Ways of the Bushwalker: On Foot in Australia.

Trends in Australian Bushwalking / Hiking
‘Australian Hiker’ podcasters and bloggers Tim and Gill Savage have prepared some excellent insights into current and trends in the world of hiking /bushwalking that are worth listening to. Here is the link to their podcast on The Future of Hiking. The episode looks at where the world of hiking appears to be heading. They discuss trends as they relate to hikers, changes we are likely to see in trail design and use, the impacts of social media on the trail, notable gear trends and the use of technology on the trail, both good and bad.
My Latest Journals and Articles
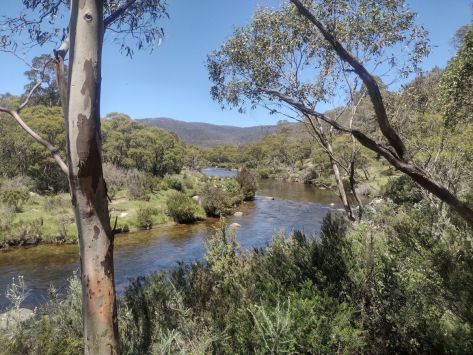
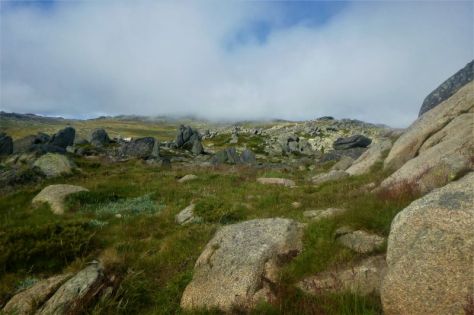
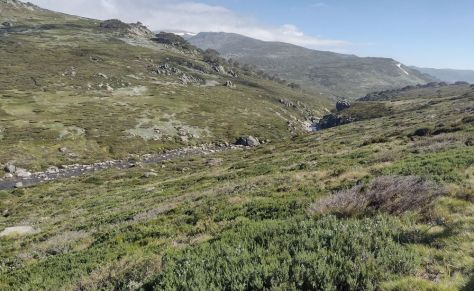
Snowies Alpine Walk: Perisher to Bullocks Flat.


Some Tips on Bush Navigation

Using a map and compass is a basic skill that should be mastered by any walkers who intend to venture away from marked tracks and trails. There is nothing mystical about the use of a map and compass or a GPS for that matter. These skills are very easy to learn and there are numerous publications and web sites that can give assistance.
My favourite publication is a little booklet published by Geoscience Australia: Natmap: Map Reading Guide (Geoscience Australia, Canberra. 2013). I confess to using GPS regularly, usually to clarify tricky navigational issues. While I like my map and compass for navigation, I was an early adopter of GPS technology and have been using a GPS and GIS software since the early 1990s.
In addition to a map and compass my walking kit does contain an Android phone with off-line georeferenced map files using Avenza Mapping and Australia Topo Maps. As insurance I cart along a small solar powered phone power bank.
Call me old fashioned, but I still enjoy unfolding a map sheet and getting a feel for the elements of the broader landscape as well as the satisfaction of finding my way across an unknown landscape. Or as the famous British author Simon Winchester once noted in an interview ” The joy of maps is incalculable. I love the things.”

Some resources on Bush Navigation

- Bushwalking NSW has an excellent tutorial page covering all the basics of bush navigation. Their webpage also provides an addtional online list of navigation resources.
- Especially useful is National Geographic’s online colour booklet Basic Map & GPS Skills.
- Book : Caro Ryan: How to Navigate. A primer on the art of traditional map and compass navigation in an Australian context.
- We Are Explorers website has a comprehensive tutorial on map and compass navigation for beginners.

Leave No Trace Principles
- Plan ahead and prepare
- Dispose of waste properly and carry out your waste if possible
- Minimise the use of campfires and use a fuel stove
- Camp on durable surfaces
- Be considerate of other walkers
- Leave what you find and don’t remove artefacts and specimens
Hiking Tricks from an old Track Dog
- Packing your rucksack: Get your pack as light as possible without sacrificing too much comfort. This means leaving out gimmicky junk, avoid duplicating group gear and for the well-heeled walker treating yourself to light-weight gear. For example, one GPS or PLB per group is enough. All gear that you need for the day: water, compass, map, lunch, raincoat should be readily accessible, usually at the top of the pack.
- My AARN pack has front pockets which makes everything so much easier. Well done Mr Aarn. Don’t tie stuff to the outside of your pack, it looks messy and can catch on shrubs and tear or even fall off. Waterproof your kit by sealing in dry bags or plastic bags. Again my Aarn pack has built -in dry bags. A pack cover as well is a good measure.
More tips……
Know your limits and be prepared for the conditions. You should always dress for the conditions expected and carry safety gear: first aid kit, sun screen, hat, water, food, torch, PLB ( if you own one) and a small survival kit which includes matches.

- Separation & getting “lost”: Don’t panic. Unless you are absolutely certain of your mistake & how to retrieve the situation STAY PUT. It is easier for a search party to find a stationary hiker than someone who keeps moving around. Find some shelter and water and try to attract attention by three blasts on your whistle. Your whistle should be attached to your rucksack where it is quickly available. A smoky fire is also useful to attract searchers. Avoid setting off a PLB unless it is a dire emergency.
- First Aid Kit: Every hiker should carry their own first aid kit on all walks in the bush in a waterproof container & have it readily accessible. I’m not a great fan of splitting up first aid items between members of a hiking party just to save a few grams in weight.
- Water: A very important consideration in Australia. Two litres per person per day is a good starting point. In hot open country you will need more. While throughwalking I often carry three litres per day & and top up whenever possible. A good splash down or swim is always a great method of cooling your body. Water from creeks can no longer be trusted and should always be treated before drinking. I always treat my water now, even from campground tanks. Never rely on someone else to provide you with water.
- Walking Poles: I use a pair of Leki poles especially when carrying heavy loads over long distances. Also they are very useful for creek crossings and downhill travel.
- Footwear: Whatever footwear you decide on, make sure they are comfortable with plenty of toe room and are well worn-in. I prefer leather boots but trail shoes are also good option. But most walkers I know wear waterproof gortex-lined trail shoes or boots. I wear two pair of socks to help reduce the possibility of blisters but very few walkers do this now.
- Blisters: On very long walks blisters are possible even with well fitting and comfortable foot wear. If you feel a “hot-spot” developing, pull over as soon as possible and apply plenty of tape over the spot. This is your last chance to avoid getting a blister. I use strapping tape but my friends use those excellent commercial grade blister pads.
- Emergency Contact: Make sure that someone you can trust knows where you are walking. Provide them with your itinerary and a mud map. But remind them that delays are always a possibility, so agree on a time for them to wait before raising an alarm. Give your leader contact details for emergencies. This could be a relative or a friend.
My Lists
GEAR LISTS
My philosophy on gear for long walks has always been to be comfortable rather than agonise over the weight of my rucksack. But now well into my seventh decade I admit to yearning to get my pack weight back to the 12 to 15 kilograms that my friends now regularly achieve. What bliss that must be.
Walkers these days are very weight conscious. An ultralighter I am not. Typically, I carry 15 to 20 kilograms on a five plus day walk. The following list for cold, wet climes should be modified when hiking in warm conditions.
Rucksack: a very comfortable Aarn Effortless Rhythm. Best ever. The Aarn has built-in dry bags. No pack cover needed but I still use a Macpac cover.
Sleeping Bag: Fairydown 1.5 kgs or Mont synthetic. Mont Thermal inner bag. Dry Bag for sleeping bag.
Sleeping Mat: Full length Thermarest Lite.
Tent & footprint: a Macpac Microlight 1 man. A sheet of light plastic for footprint.
Stove and cookset: a MSR pocket rocket. Mini Trangia cookset. Cigarette lighter, box of matches in plastic bag or container. Gas cylinder. Use metho if you have concerns about using a fossil fuel.
Cutlery: Wooden spoon. Small penknife. Billy grippers.
Scourer: Also a Chux used for tea-towel.
First Aid Kit: Safety whistle attached to outside of rucksack not hidden in first aid kit. First Aid Kit readily accessible.
Shirt and board shorts to wear: Shirt: I prefer double pockets for pencil and notebook. Shirt is usually cotton. In wet or cold conditions I change to a thermal shirt.
Spare shirt and spare thermal shirt: Spare long trousers: all dry- bagged.
Raincoat: Mont Goretex, long length. Rainpants: Mont .
Beanie. Mittens/gloves. Nylon over-mittens.
Fleece Coat: Mont. Weight depends on likely weather.
Water bottles: Two re-used soft drink bottles. Plus 2 x2 litres Platypus plastic bladders. Puri/aquatabs for water purification. Temperatures less than 25o C, carry at least one litre for every 10 kilometres. Above that, look at taking one litre for every kilometre.
Keen Ridgeline waterproof boots: The footwear industry has moved on and like most of my walking companions I now wear lightweight synthetic trail shoes or boots. Socks: I usually carry 2 pair of woollen Stockpiles. Wear a pair and one pair stashed in dry bag.
Walking Poles: Lekis.
Gaiters: Sea to Summit Quagmires and a pair of Snake Safe gaiters
Light Teva sandals for camp wear.
Toilet Gear and hand wash.
Hat: Broad-brimmed. Unfashionable… but best for walking in Oz.
Food: Typically 600-800 g daily ration.
Headtorch: carry one set of spare batteries.
Helinox folding camp stool or Thermarest chair.
Survival Kit: Should be in one pouch. Matches, length of cord, small torch, signalling mirror, notebook and pencil, small multi-purpose knife, cable ties, roll of tape, needle and thread. Surprising how often it gets used.
Snow Trips: When on a snow trip I carry: waterproof Ski Pants, Ski Gloves, additional Fleece Coat and Thermal layers. I dry bag as many of these items as possible. MSR Snowshoes.

Food Lists
This menu is moderately ok for a week or so and seems to provide enough energy for me; although I do look forward to a regular meal after 10 days on the hoof. Many of my bushwalking friends have those yummy freeze dried meals for dinner. A tad expensive to enjoy every night. So I buy two person serves of these freeze dried meals, divide into two separate meals, add some Instant Potato or noodles or freeze dried rice and then brew up the mixture.
‘Continental’ brand pasta meals or rice meals with added noodle padding are ok… occasionally. For the first night on the track my friends are addicted to Bangers and Mash… pre-cooked sausages wrapped in foil with a dob of instant mashed potato, and a side salad of dried peas. Lately, for my first evening meal I have been carting in those pre-cooked Indian curries and adding rice.
Breakfast
Pog aka porridge: a big mixture of rolled oats, sultanas, apricots, prunes, coconut, powdered milk and sugar. I soak this mixture overnight to minimize use of gas the next morning. In the morning I bring the mixture to a quick boil then sprinkle with homemade muesli.
Toast: take a few leftover heels of bread from home and smother with peanut paste (butter ). One of my hiking companions bakes a small loaf of yummy, treackly bread which I can spin out for 8 to 10 days.
Coffee: a pre- mix of instant coffee, powdered milk, sugar.
Morning tea
Muesli Bar: I usually survive on just half of one.
Scroggin: aka Trail Mix: one packet per day to last for morning tea, lunch & arvo tea if I’m really thrifty. Several handfuls for morning tea. I make my own. Mixture of salted or unsalted nuts, roasted almonds, choc-coated sultanas (sheep droppings) or choc-coated licorice, ginger, dates, apricots, or anything else that takes my fancy.
Water: I always make sure to drink plenty of water.
Fruit: Generally try to carry apples for the first few days.
Lunch
Scroggin: again!!
Muesli Bar: whatever is left from morning tea.
Biscuits or Rye Bread: usually 4 biscuits; any dry biscuit. I prefer Wheatmeals or Cheds. Spread with peanut paste or cheese. If I have bread I spread it thickly with peanut paste.
Cheese: either soft spreadable cheese wedges or I take a block wrapped in grease proof paper & then a small cloth bag,
Energy Powder Drink: one cup.
Afternoon tea
Always after tent is set up & gear sorted out: plenty of fluids. Several cups of sweet tea a cup of soup and an energy drink.
Dinner
Soup: dried soup.
Main Course: Read my comments at the beginning of the food list section. If I am feeling lazy and flush with funds I prefer to treat myself to freeze dried meals. Otherwise I pre – prepare and bag varying combinations of the following: mixture of freeze dried mince, cous cous, dahl, carrot, celery, sultanas, red lentils, dried peas or beans, noodles, part of pasta/rice meal ( eg chicken curry), spoonful of dried soup, teaspoon mild curry.
Sometimes I fry up almonds, peanuts, garlic and dried onion, carrot or celery and toss them in. Then I pour boiling water onto this goo about half an hour before eating then give it a final reheat once the peas are vaguely soft. Maybe you should just treat yourself to a delicious (?) freeze- dried meal.
Dessert: a chocolate bar. Usually 4 squares.
Hot drink: I make up a mixture of hot choc and powdered milk but most walkers have something far more exotic and tasty in those little pre-mix sachets.
First Aid Kit
- One 10 cm x 3.5 metre compression bandage ( not soft crepe, needs to be heavy weight ). I carry a Setopress medium/high compression. bandage as well as several other wide compression bandages.
- One triangular bandage for sling, wounds etc.
- One non-adherent dressing 10×10 cm ( Melonin, Cutilin ).
- Leucoplast tape 2.5 cm ( strong tape for holding everything ).
- Small roll Fixomill 5 cm ( sticks dressings or can go straight onto skin ); for abrasions & burns.
- One 10 cm Duoderm or Allevyn ( hydrocolloid; cut into shapes for blisters ).
- Butterfly/ Steristrips 6 mm or similiar ( gaping cuts to pull edges together ).
Some Extras
- Skin cleanser x2 sachets.
- Betadine small 15ml bottle ( antiseptic ).
- Safety pins x 6.
- Scissors blunt.
- Tweezers ( good ones ).
- Ether-based spray for freezing ticks. I buy Medifreeze applicator.
- Space blanket.
Medications
- Ibuprofen ( Neurofen ) x10 anti-inflammatory.
- Panadol x 10 pain relief.
- Gastrostop ( Immodium ) x 6 diarrhoea.
- Telfast ( one a day ) x 6 antihistamine.
- Antibiotic for skin infections (Dicloxicillin ).
- Saline solution.
- Hydralyte x 2 sachets.
Troublesome Ticks
What every Aussie bushwalker should know before hitting the track
There’s nothing quite like bushwalking in Australia — snakes, spiders, leeches… crocs. You name it, we’ve got it. But along with all those nasties there’s a tiny hitchhiker that every bushwalker should be aware of… ticks.
These bloodsucking pests are more than just an itchy inconvenience — in some cases, they can cause serious health issues. Here’s what you need to know to stay safe on the trail.
How Many Tick Species Live in Australia?
Australia is home to about 70 species of ticks, but only a handful bite humans. The most well-known is the paralysis tick (Ixodes holocyclus), found along the eastern coast — from far north Queensland to Victoria. It’s responsible for the majority of tick bites in humans and pets.
Prevention: How to Avoid Tick Bites
- Wear long sleeves and pants (tuck pants into socks)
- Use insect repellent containing DEET
- Avoid brushing against vegetation
- Wear light-coloured clothing so ticks are easier to spot
- Do a tick check when you finish your hike — especially underarms, behind ears, waistband area, scalp
Bitten? What to Do About a Tick
If you find a tick attached to your skin, don’t squeeze, scratch, or pull it out with tweezers. This can cause it to inject more saliva or even break apart.
Best practice:
- Freeze it, don’t squeeze it – use a tick-freezing product like aerosol ether spray. I use Medifreeze (available at chemists).
- Once frozen, it should fall off.
- Check the bite site for swelling, redness, or rash.
- Don’t try to remove it with methylated spirits, kerosene or petroleum jelly. These methods can make things worse.
️When Tick Bites Turn Serious
While most tick bites are mild, some people can have severe allergic reactions — including anaphylaxis. Symptoms to watch for:
- Difficulty breathing or swallowing
- Swelling of face, lips or tongue
- Rapid heartbeat
- Widespread rash or hives
- Dizziness or confusion
If any of these occur, think about calling Triple Zero (000) .
Also keep in mind:
- Some individuals develop tick-induced mammalian meat allergy (MMA) — a reaction to eating red meat after a tick bite.
- Repeated bites can sometimes cause long-term sensitivity.
Stay Safe
Ticks might be small, but being prepared makes a big difference. With the right clothing, repellent, and knowledge, you can explore Australia’s bush with peace of mind.
A Tick Tale
I have had numerous tick bites, but one was more than I bargained for. Many moons ago, I was camping with my young family and friends at the Bunya Mountains in South East Queensland. Well known for its profusion of ticks. This tick latched onto my scalp, and by the time I realised it was there, my throat and tongue were swelling rapidly.
My wife quickly removed the little blighter, bundled me into the car, and took off posthaste down a winding range to the Dalby hospital, 50 kilometres away.
Thankfully, the symptoms began to subside while I was under observation. I got lucky. I’ve been bitten many times since, but never had the same reaction.
These days, I do my best to avoid ticks through prevention and early action. I find the freezing technique works best, and I swear by Medifreeze — it’s a must-have. I also carry a few quick acting antihistamine tables in my first aid kit.
Lurking Leeches
Whether you’re hiking the steamy tracks of North Queensland or exploring the cool temperate forests of the south, wrangling leeches is almost a rite of passage for bushwalkers.
Common Types of Australian Leeches
Australia is home to over 50 known species of leeches, most of which belong to the genus Gnatbobdellida or Haemadipsa. The most commonly encountered by hikers are:
- Brown Land Leech (Haemadipsa zeylanica) – Found in tropical and subtropical rainforests, particularly in Queensland and New South Wales.
- Tiger Leech (Chtonobdella limbata) – Distinguished by its striped body; common in wetter environments, especially in far north Queensland.
- Freshwater Leeches – More likely to be found in creeks or waterholes, these are less aggressive toward humans.
Not all leeches feed on humans, but those that do are very tenacious.
When & Where Leeches Are Most Active
- After rain or in high humidity — perfect conditions for leech activity.
- Dense rainforests, wet sclerophyll forest, sub-tropical rainforest and wet gullies — especially in Queensland’s Wet Tropics, and closer to my home Lamington National Park, Conondale National Park and the Bunya Mountains.
- Under leaf litter, on low vegetation, and even hanging from trees — they can fall or stretch out and grab onto the unsuspecting walker..
How Leeches Attach
Leeches detect body heat, movement, and even the carbon dioxide in our breath. They creep along using their sucker-like ends, then latch on with their sharp jaws.
Once attached:
- They secrete anesthetic, so you rarely feel the bite.
- Anticoagulant enzymes are released to keep your blood flowing — handy for them, messy for you.
- They can swell to several times their size before detaching or being noticed.
Prevention Tips
- Wear long pants and long sleeves.
- Spray boots and legs with Rid- DEET.
- Keep moving.
What to Do If Bitten
- I usually carry a roll-on container of Rid – DEET which I apply to the offending leech. They usually drop off without needing to be flicked off or forcibly removed.
Unlike ticks or mosquitoes, leeches are not known to transmit serious diseases to humans in Australia. However, improper removal or scratching the bite can lead to secondary infections, especially in tropical climates. Always clean bites and monitor for redness, swelling, or pus. I usually react with a red, itchy swelling that lasts for days.
Nightmare in the Queensland Tropics
Many years ago, some friends took off for multi-day hike on the Misty Mountains Trail in North Queensland. The rain had been steady, turning the track muddy and the air into a sauna. The leeches were, apparently, very attentive. Every break required a leech check.
But the real drama came that night.
Sometime in the depths of a pitch black rainforest night my friend woke with itching eye lids. Leeches had latched onto his eyelids while he slept. Fortunately, they managed to detach them without damaging his eyes or pulling out an eyeball. But the thought of leeches on someone’s eyes or eyelids still gives me the creeps.
Leeches are a part of the Australian hiking experience, especially in wet, tropical regions. While they’re unpleasant, they’re largely harmless… mostly.
